



Mobile App User Manual

Step by step operational guidance.
Reliable Logistic And Transport Solutions That Saves Your Time!

Our Global Logistics Expertise Will Help Analyze & Develop Successful Supply Chain Strategies.

Family Business Award

We believe that partnerships are fundamental to our growth. We'll seek the highest quality global forwarding services.

Excellence in Exporting

When we communicate, we are honest and direct. We won't make excuses, simply offer you a concrete solutions.

Top Leading Global Trade

As a logistics solutions provider, we’ll monitor your logistical objectives and make sure all your logistical activities.
13
Always Committed to Excellence
Video User Guidance

In this video there is a complete user guidance that how it will work..

Bus Operations

In this section of video complete presentation of parent’s login and view student Attendance, bus schedule and bus contacts.

Operational Notification

In this section of app parents can get notification of a child operations on behalf of Arab Falcon Bus staff.

24/7 Hours Support

We enhance our logistics operations by relieving you of the worries associated with freight forwarding.

Accounts

In this section of video complete presentation of student accounts like payment receipt and invoice..
Step 1 — Download & Sign In

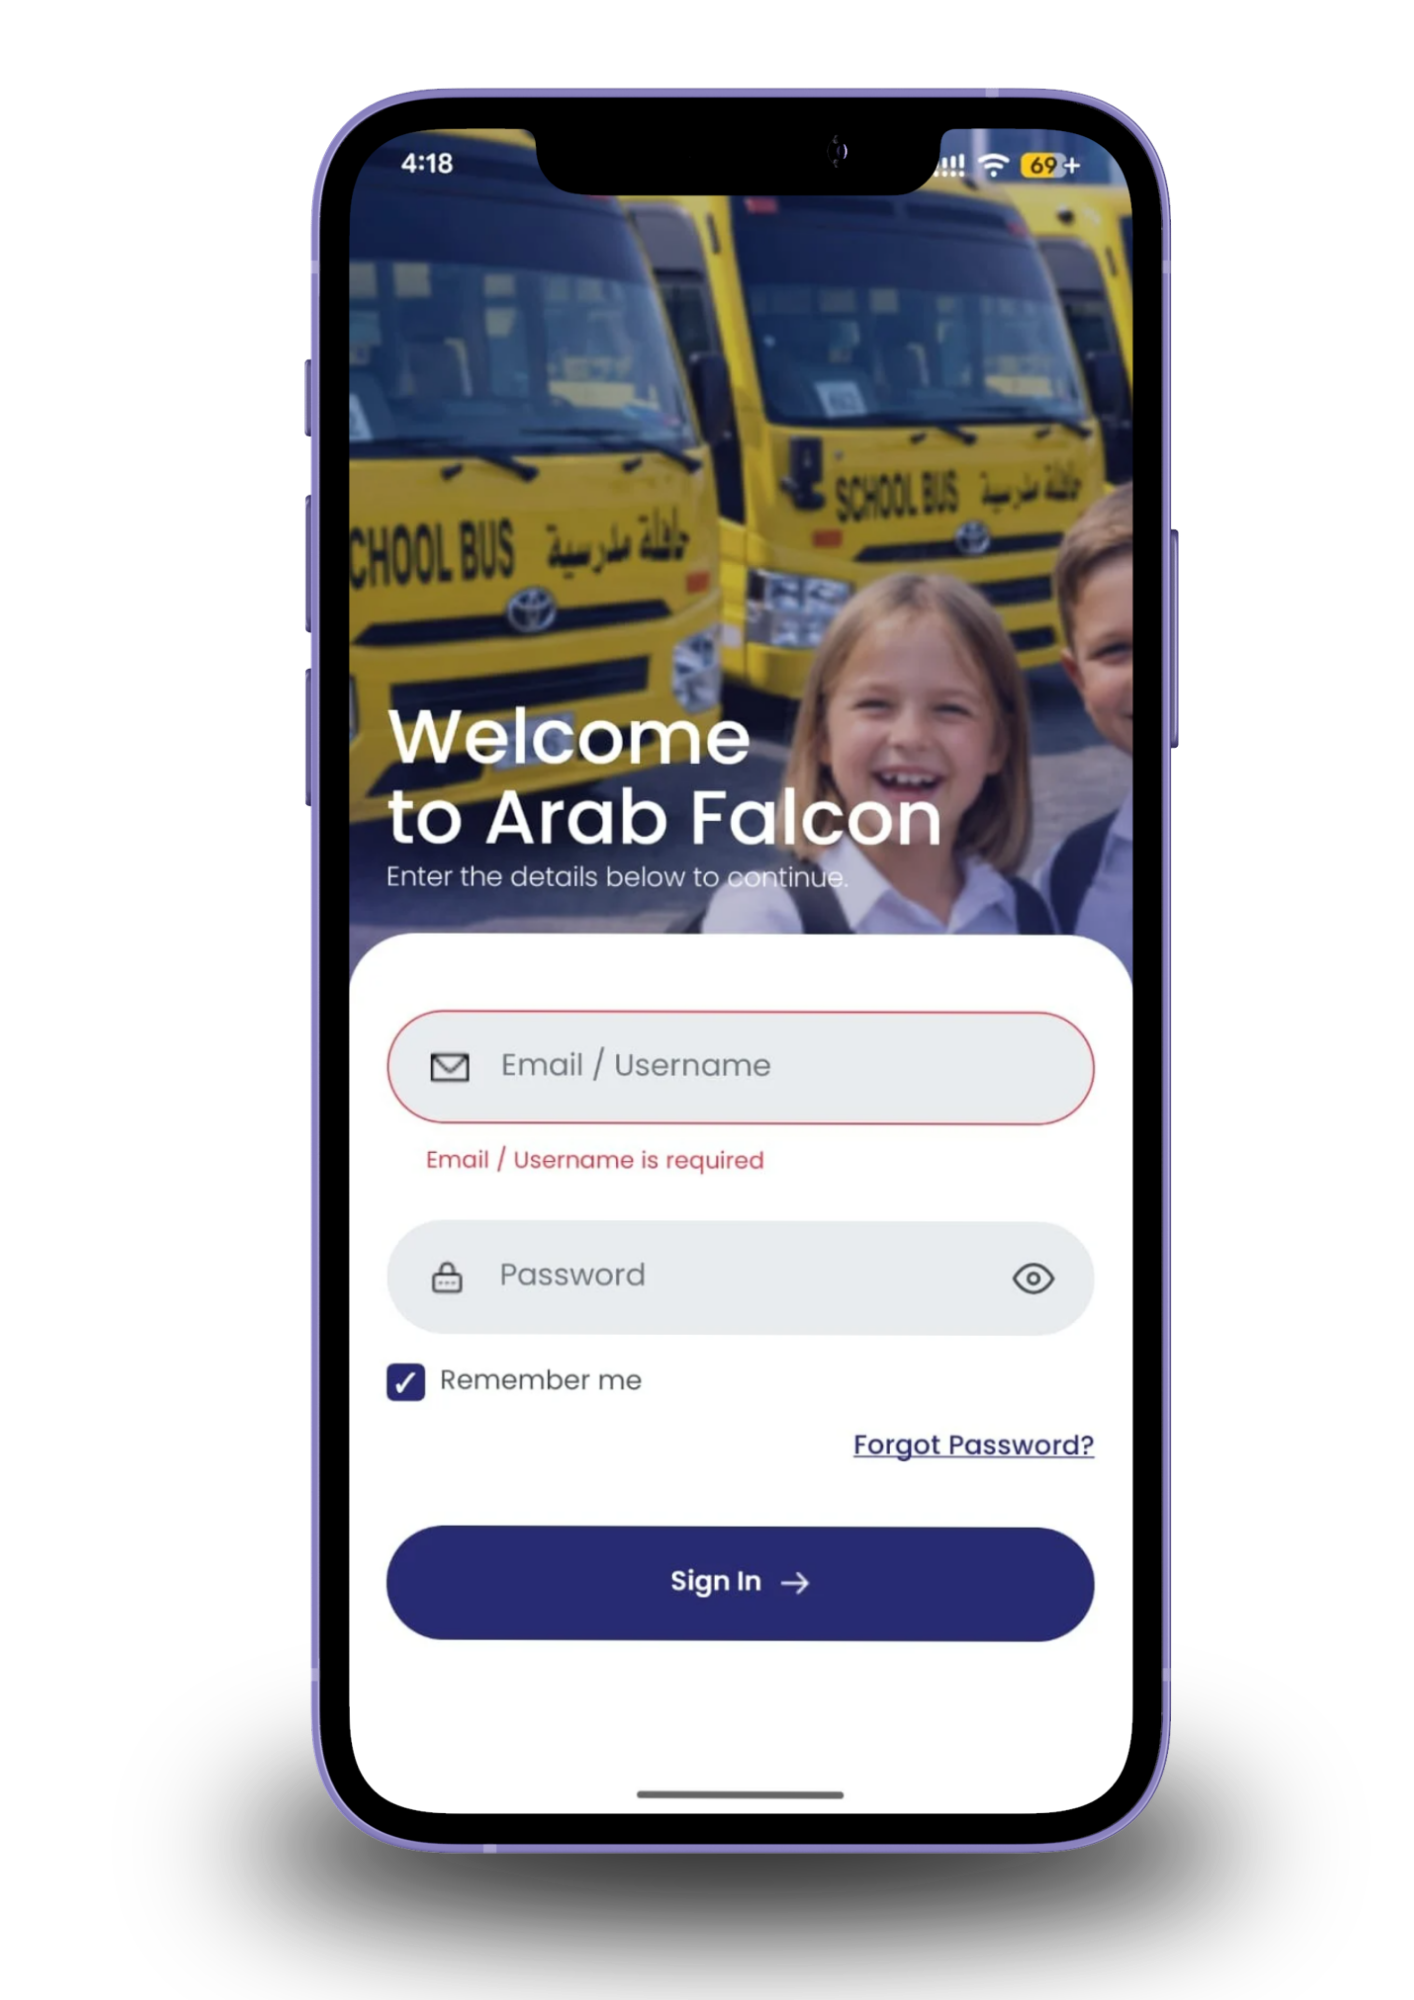
Screen: Login Screen

Search for Arab Falcon on the App Store or Google Play and install the app.
Open the app and enter your Email/Username and Password.
Your username is your registered parent email address.
Your password is your registered mobile number with Arab Falcon.
Tick Remember Me to stay signed in on your device.
Forgot your password? Tap Forgot Password to reset it.
Tap Sign In to access your dashboard.
Step 1 — Download & Sign In

Screen: Login Screen

Search for Arab Falcon on the App Store or Google Play and install the app.
Open the app and enter your Email/Username and Password.
Your username is your registered parent email address.
Your password is your registered mobile number with Arab Falcon.
Tick Remember Me to stay signed in on your device.
Forgot your password? Tap Forgot Password to reset it.
Tap Sign In to access your dashboard.
Step 2 — Home Dashboard

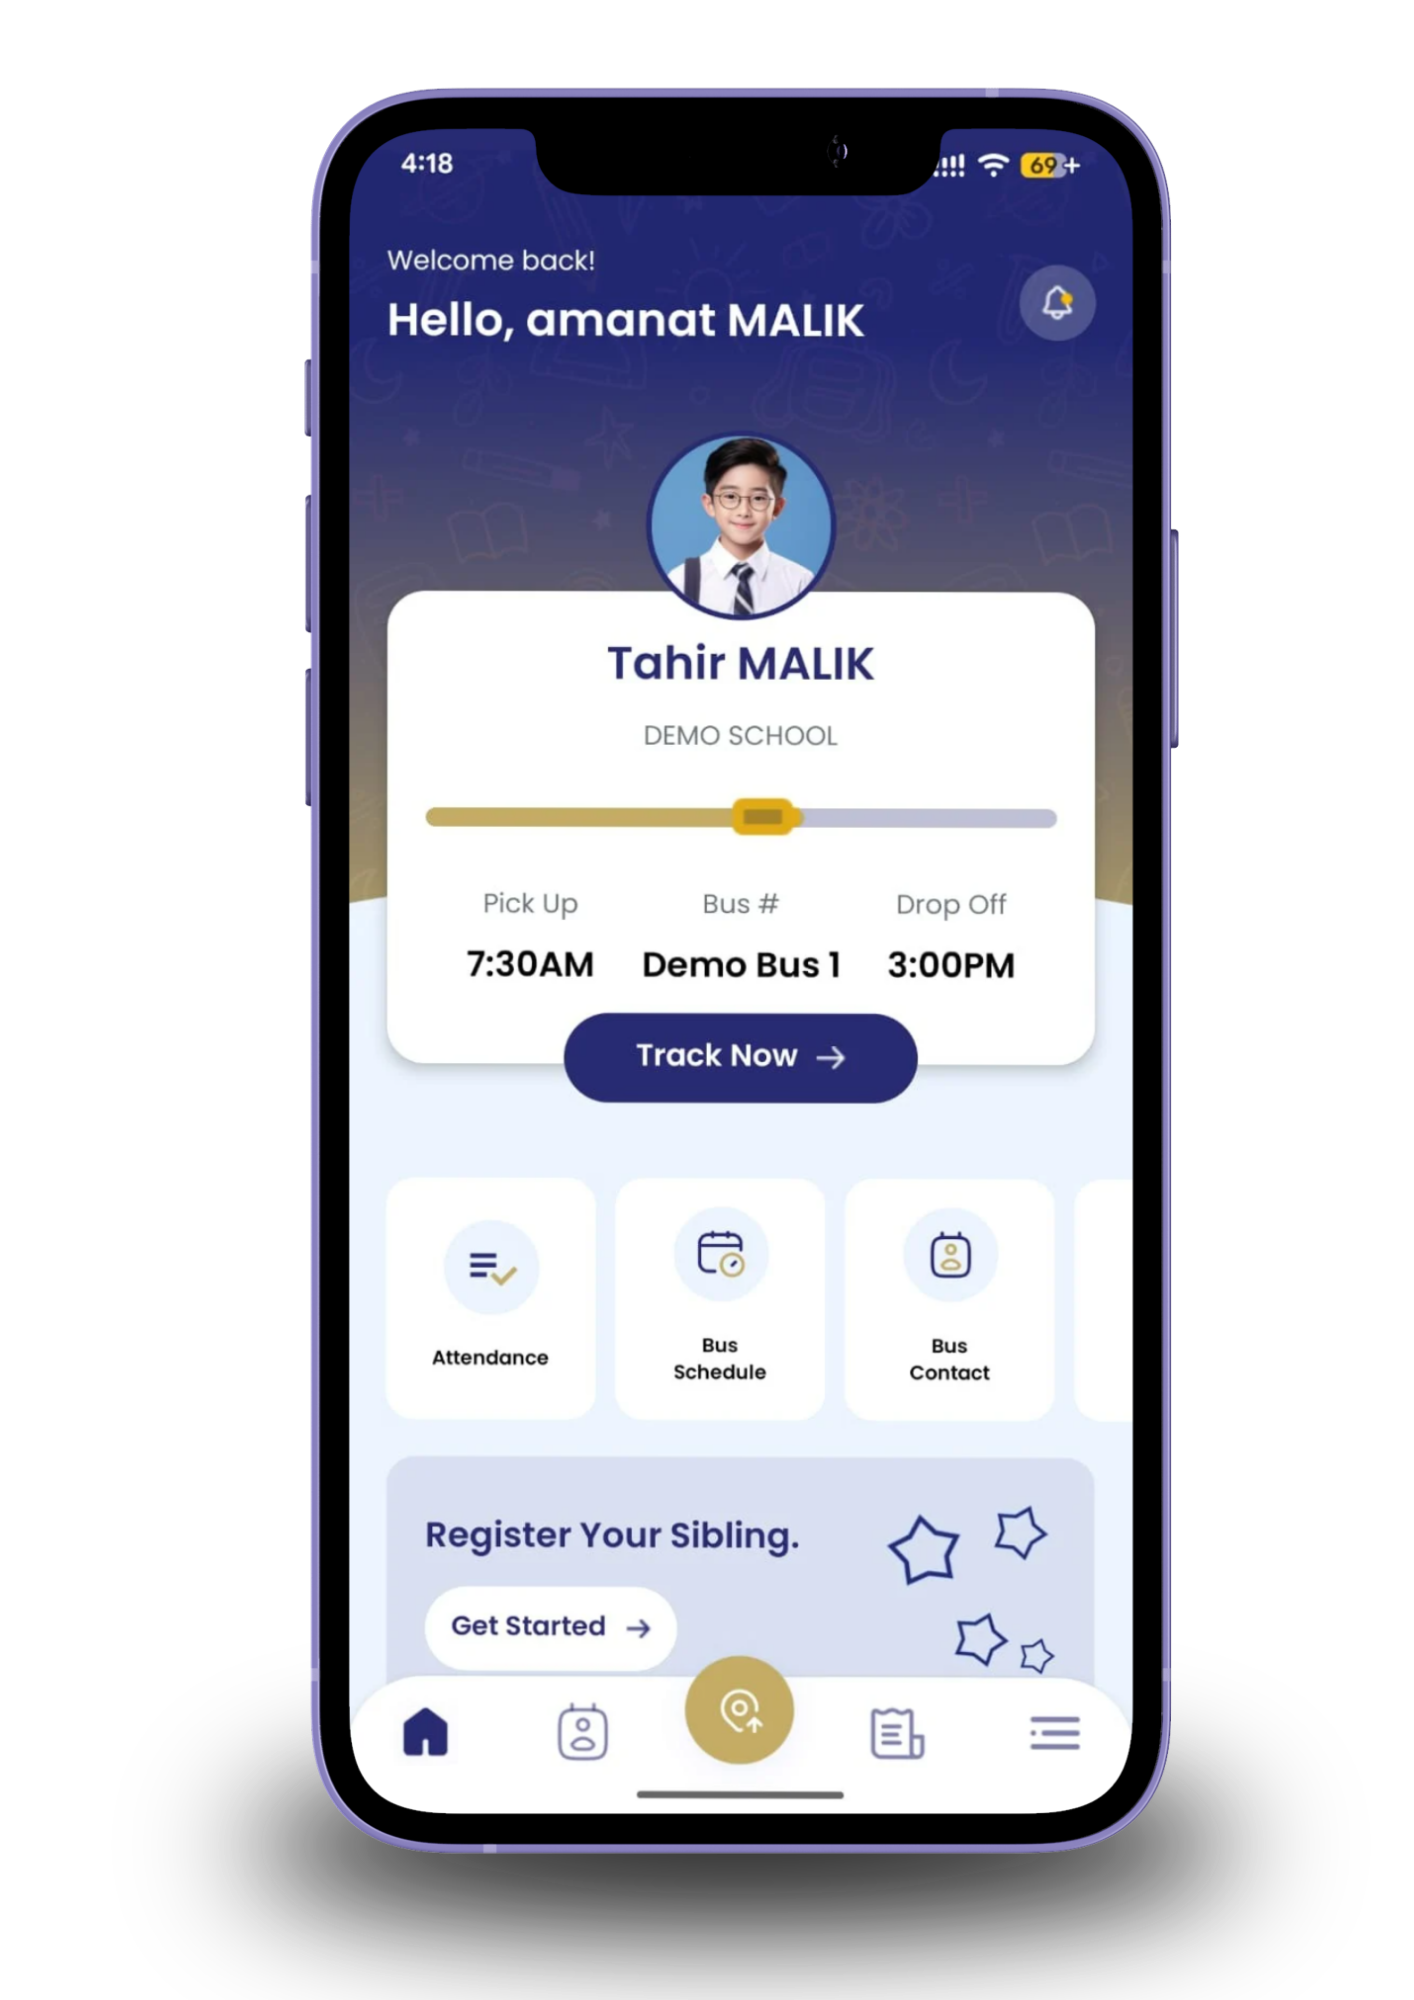
Screen: Home Screen

After logging in, your dashboard welcomes you by name and displays a notification bell at the top.
Your child’s photo, name, school, and bus details are displayed on the home card.
View today’s Pickup Time, Bus Number, and Drop-off Time at a glance.
Tap Track Now to launch live bus tracking instantly.
Quick access tiles for Attendance, Bus Schedule, and Bus Contact are available below.
Use the Register Your Sibling banner to add another child to your account.
Step 3 — Live Tracking

Screen: Live Tracking Screen (Map View)

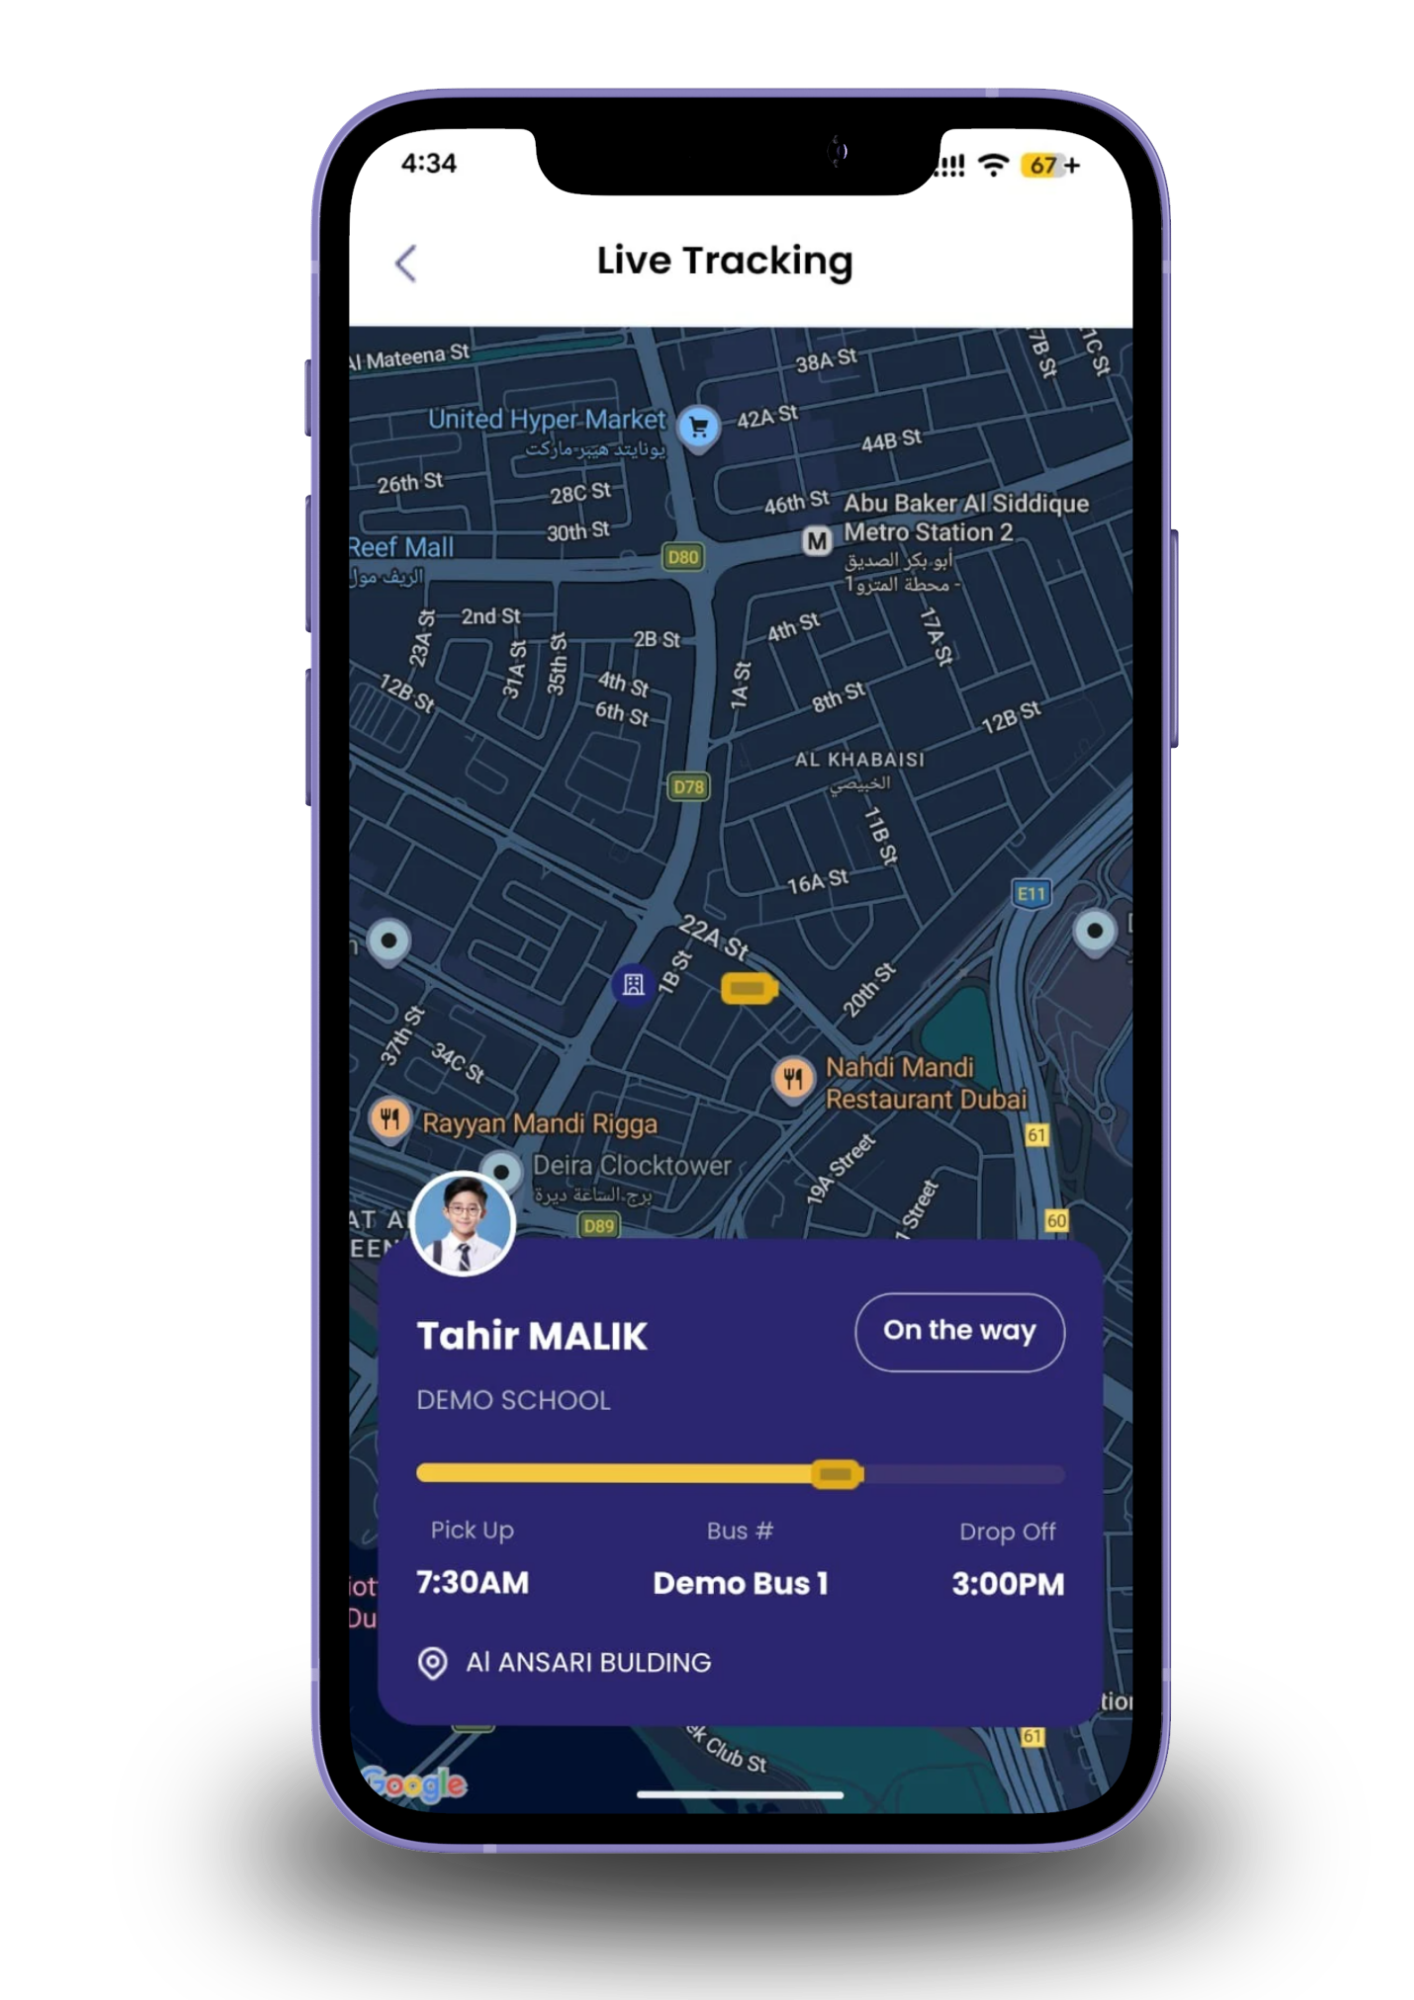
Tap Track Now from the Home Screen to open the Live Tracking screen.
A live Google Map displays the real-time location of your child’s bus.
The bus icon moves on the map as the bus travels along its route.
The status badge shows whether the bus is On the Way or at another stage of the journey..
Your child’s name, school, bus number, pickup time, drop-off time, and pickup location are shown at the bottom of the screen.
The map updates automatically — no refresh is required.
Step 3 — Live Tracking

Screen: Live Tracking Screen (Map View)

Tap Track Now from the Home Screen to open the Live Tracking screen.
A live Google Map displays the real-time location of your child’s bus.
The bus icon moves on the map as the bus travels along its route.
The status badge shows whether the bus is On the Way or at another stage of the journey..
Your child’s name, school, bus number, pickup time, drop-off time, and pickup location are shown at the bottom of the screen.
The map updates automatically — no refresh is required.
Step 4 — Attendance

Screen: Attendance Screen

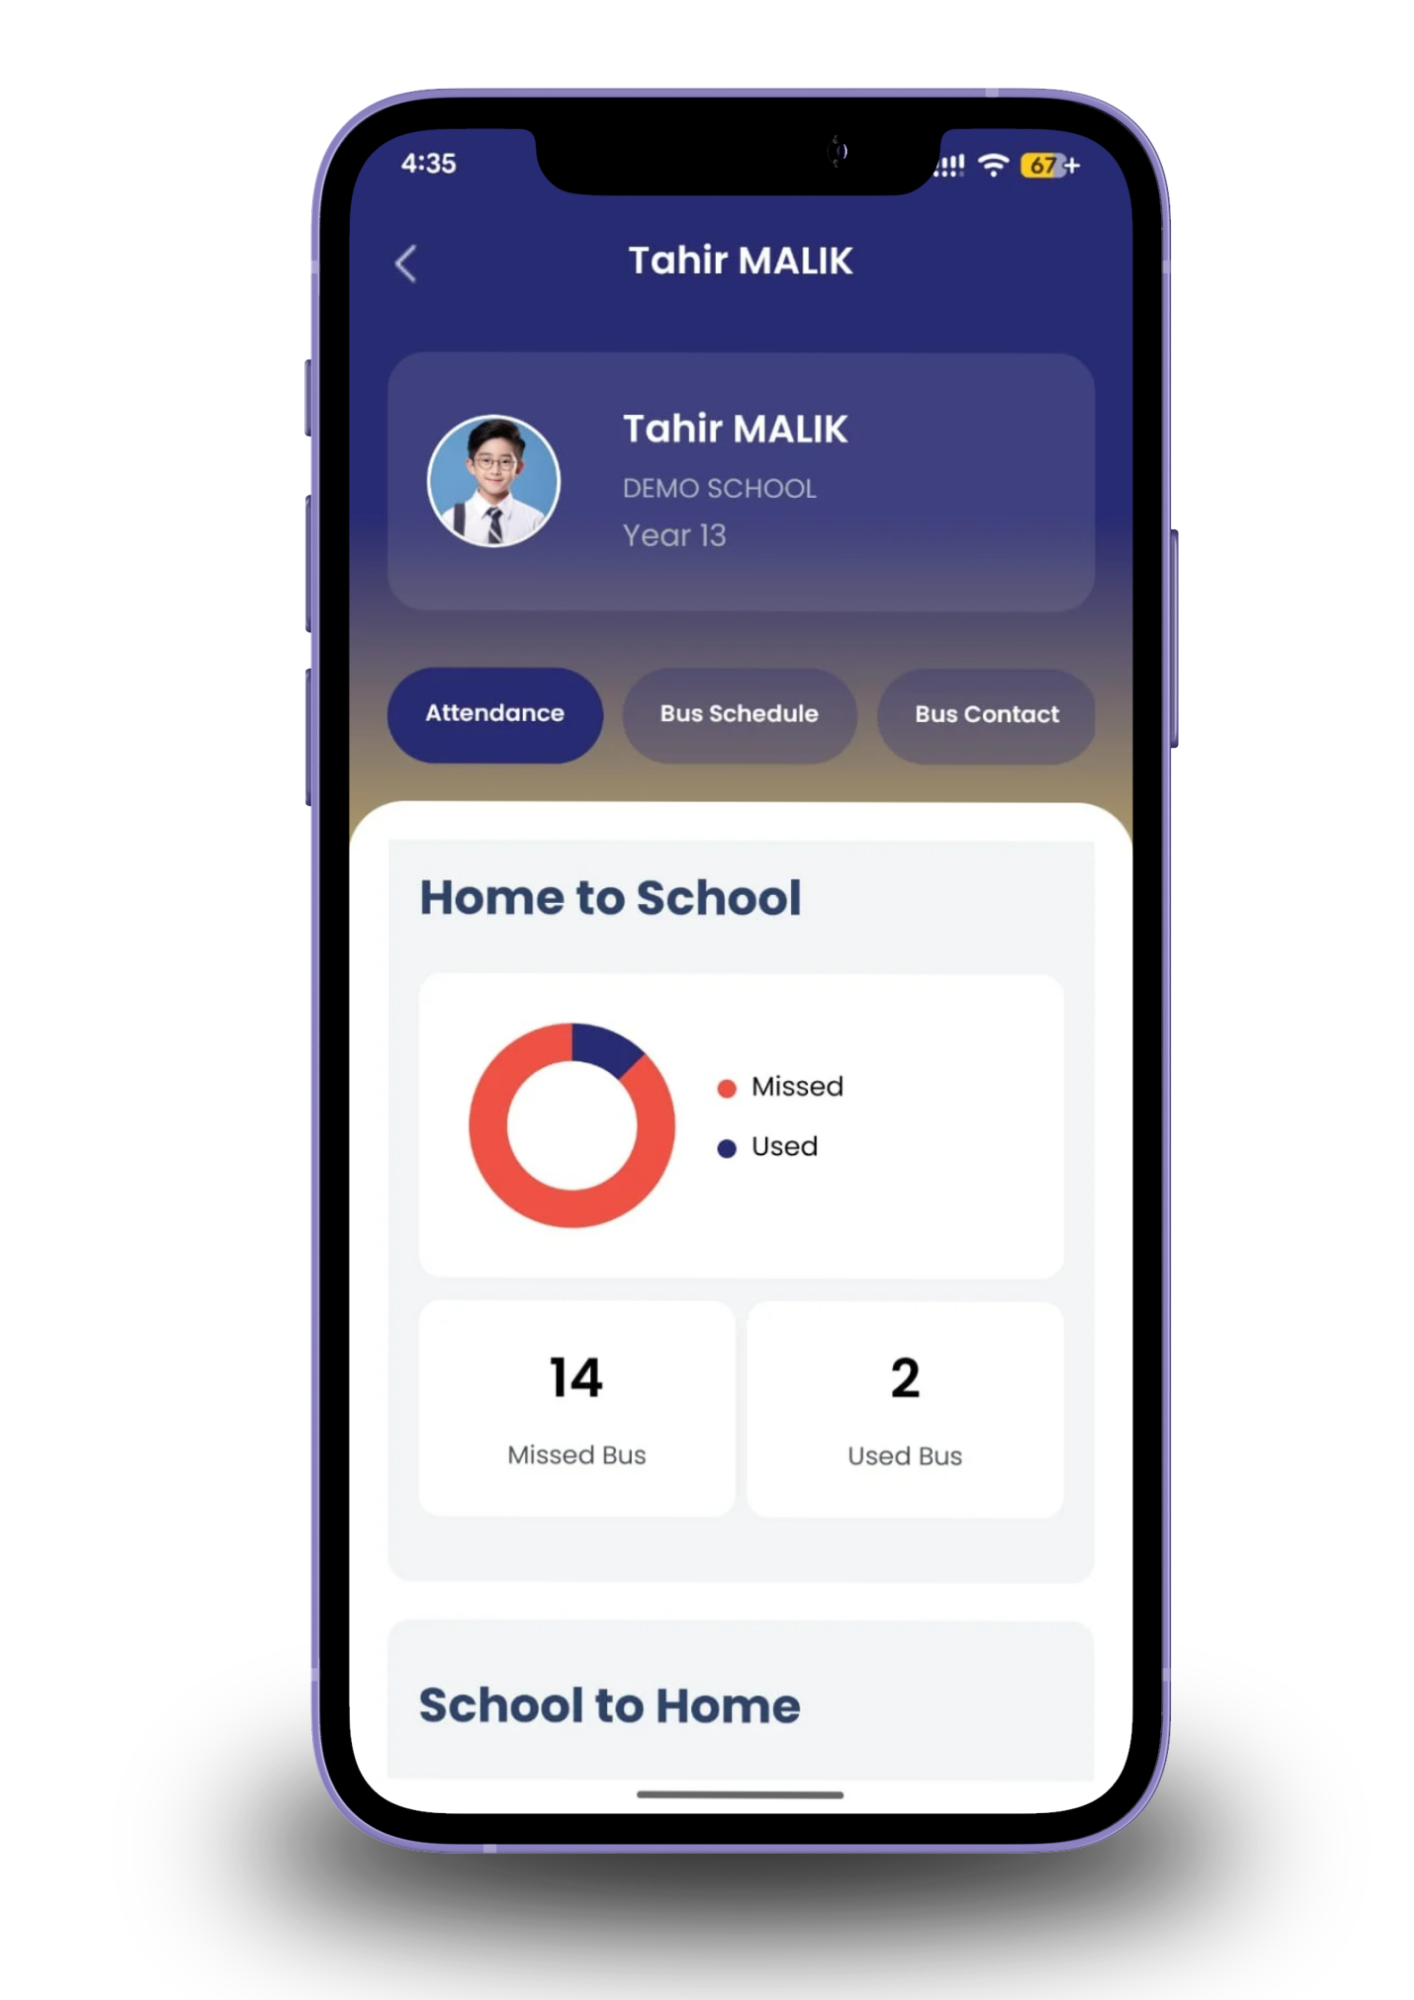
Tap the Attendance tab from your child’s profile screen.
View a monthly summary of bus usage separately for Home to School and School to Home journeys.
A donut chart visually displays the ratio of Missed vs Used bus trips.
The total number of Missed Bus and Used Bus days is shown below the chart.
Switch between months to review attendance history for any period.
Step 5 — Bus Schedule

Screen: Bus Schedule Screen

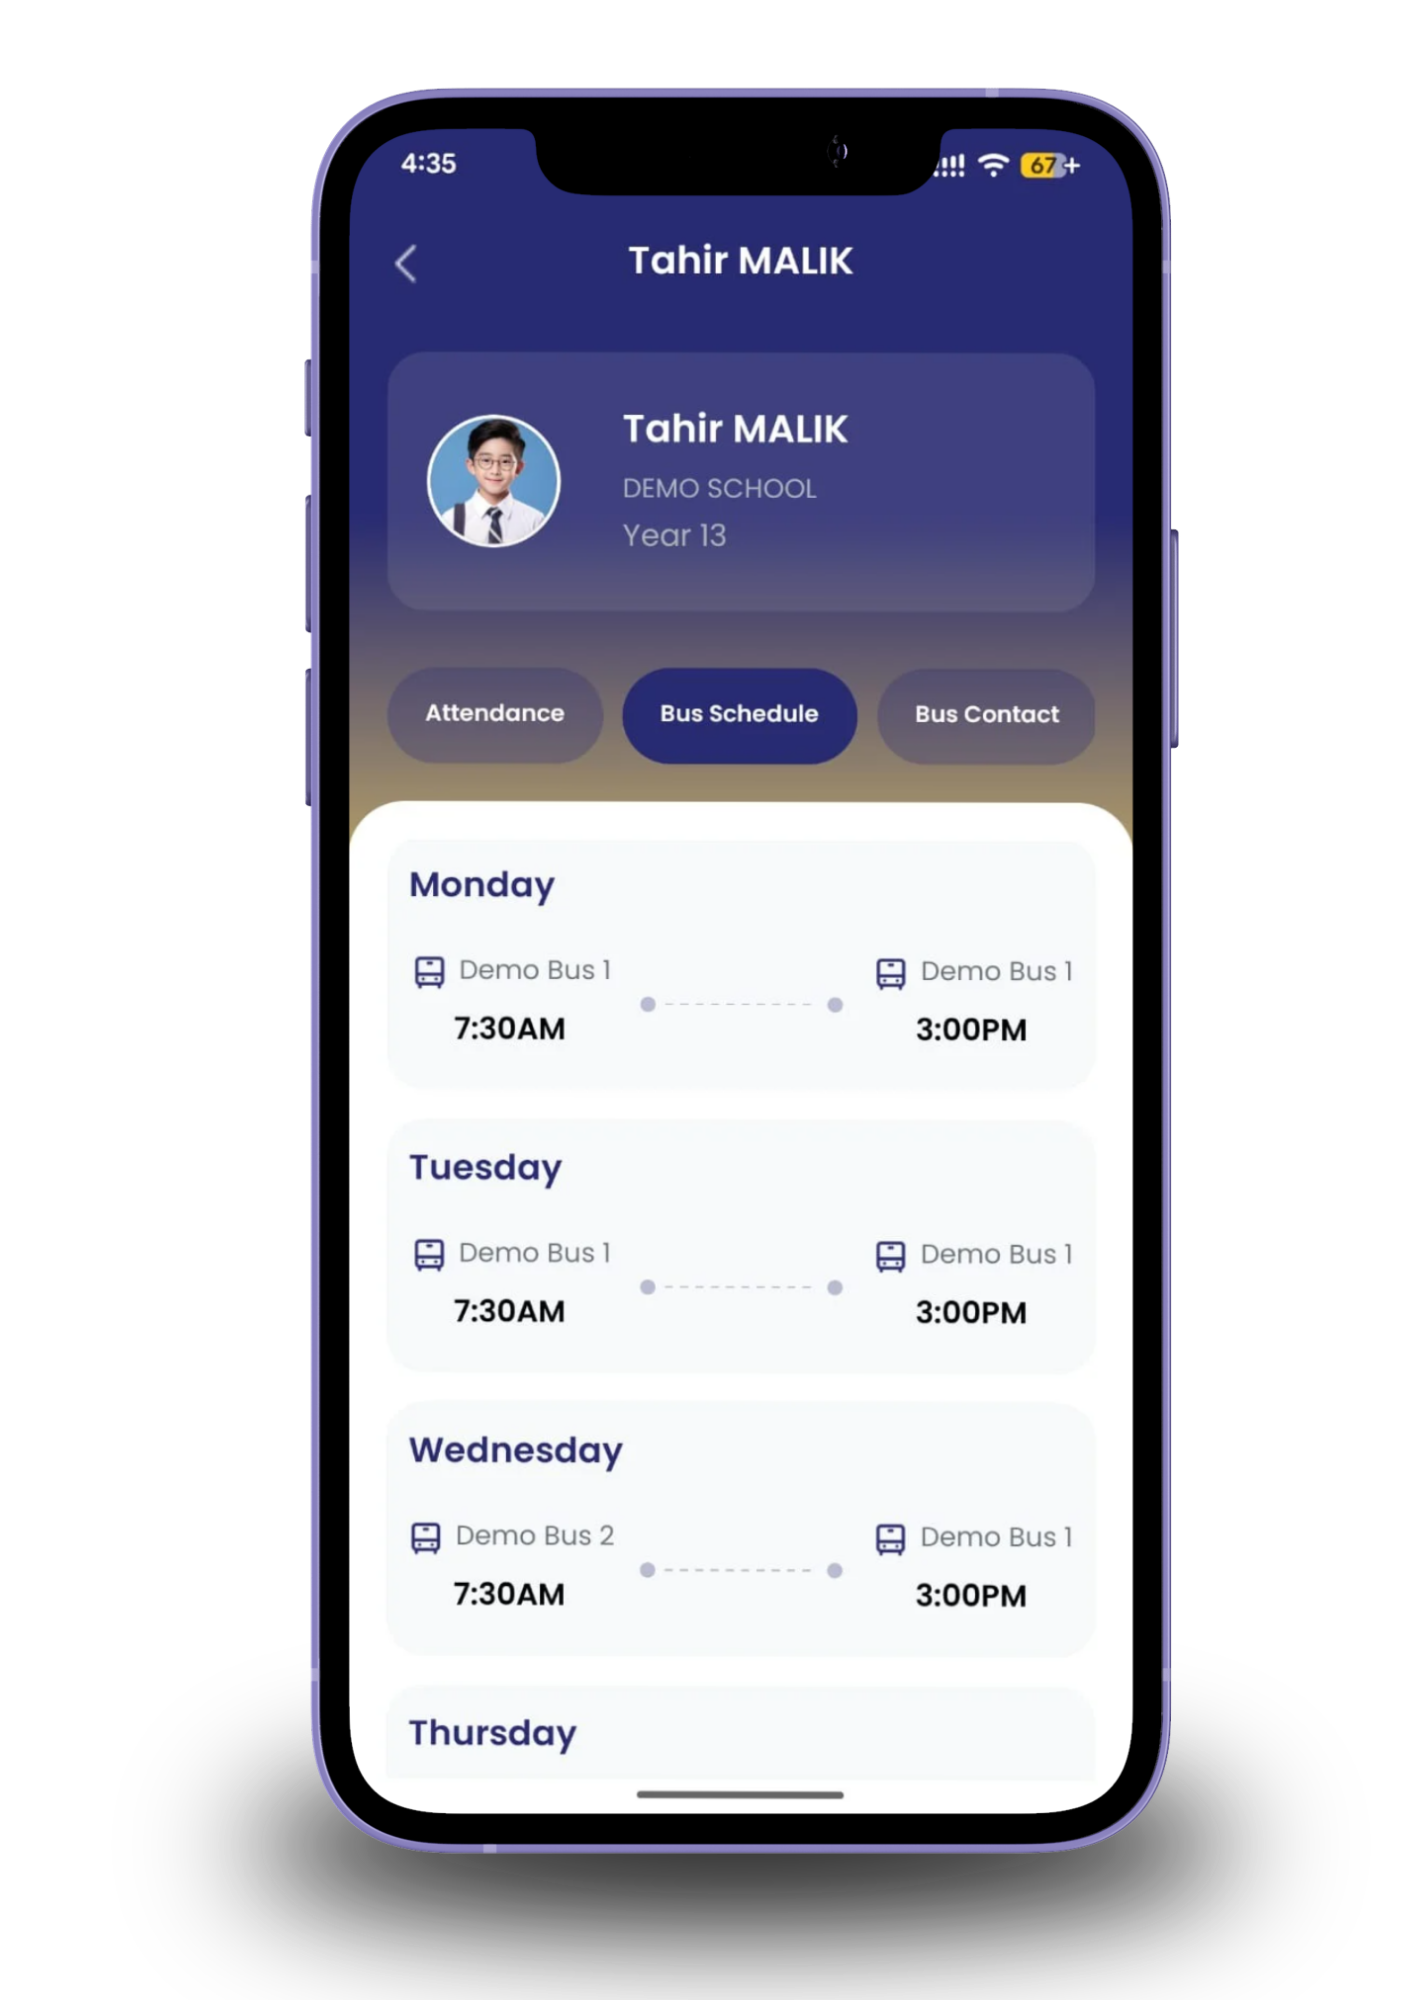
Tap the Bus Schedule tab from your child’s profile screen.
View the complete weekly timetable from Monday to Sunday.
Each day displays the assigned bus number, morning pickup time, and afternoon drop-off time.
Different buses may be assigned on different days — all assignments are clearly listed.
Both the morning and return journey buses are displayed side by side for each day.
Step 5 — Bus Schedule

Screen: Bus Schedule Screen

Tap the Bus Schedule tab from your child’s profile screen.
View the complete weekly timetable from Monday to Sunday.
Each day displays the assigned bus number, morning pickup time, and afternoon drop-off time.
Different buses may be assigned on different days — all assignments are clearly listed.
Both the morning and return journey buses are displayed side by side for each day.
Step 6 — Bus Contact

Screen: Bus Contact Screen

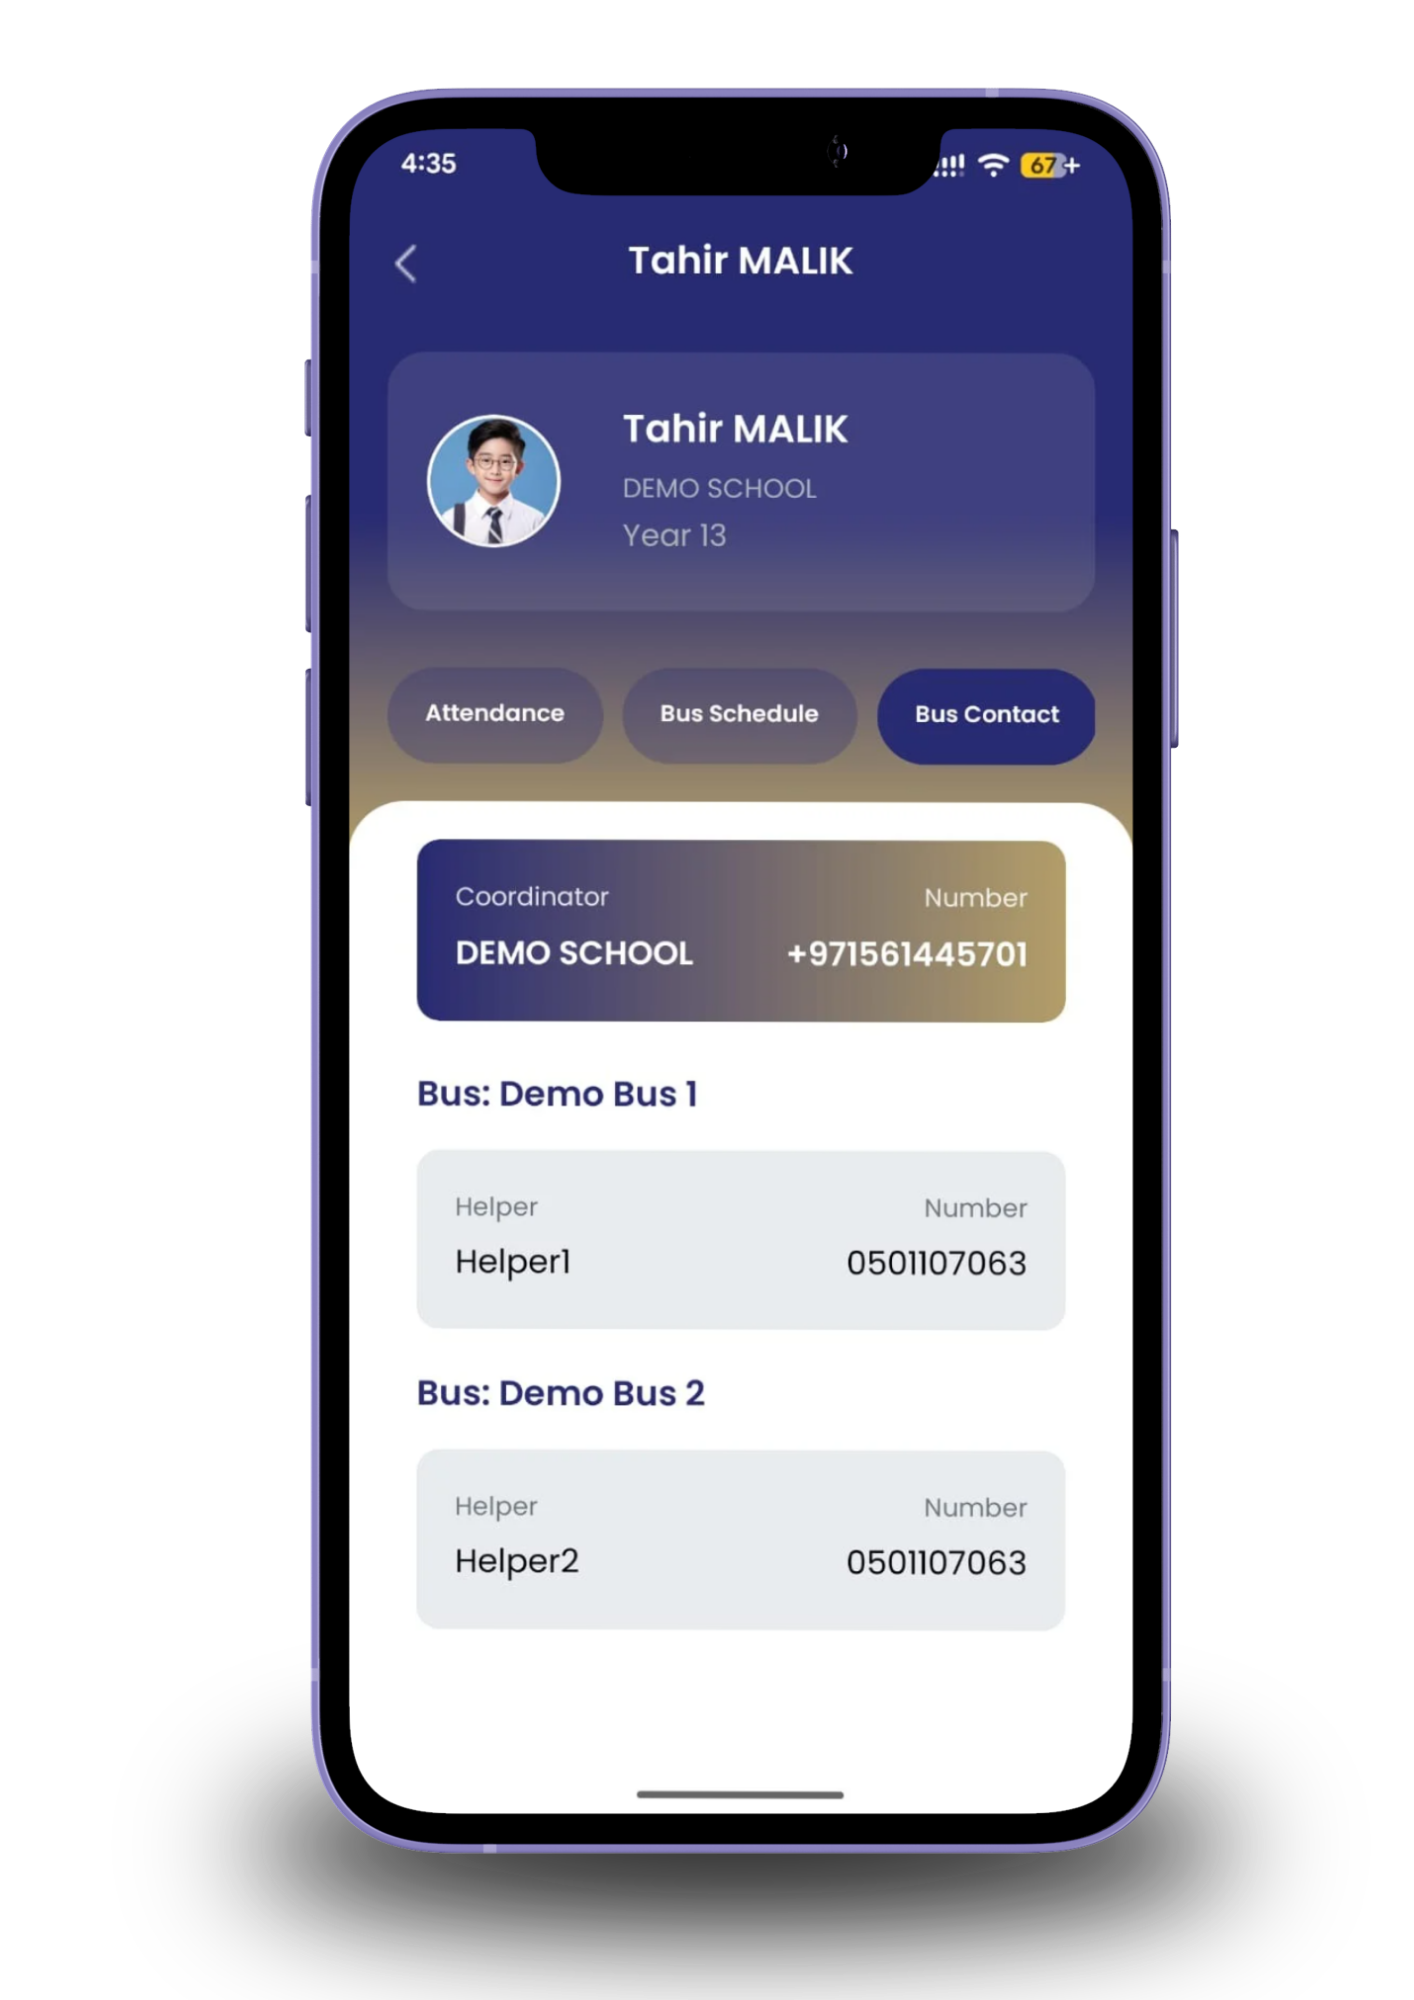
Tap the Bus Contact tab from your child’s profile screen.
View your school coordinator’s name and direct contact number at the top.
See the assigned bus helper’s name and contact number for each bus
If your child uses more than one bus during the week, all bus contacts are listed separately.
Contact details are kept up to date and readily available for any queries.
Step 7 — Payment Receipt

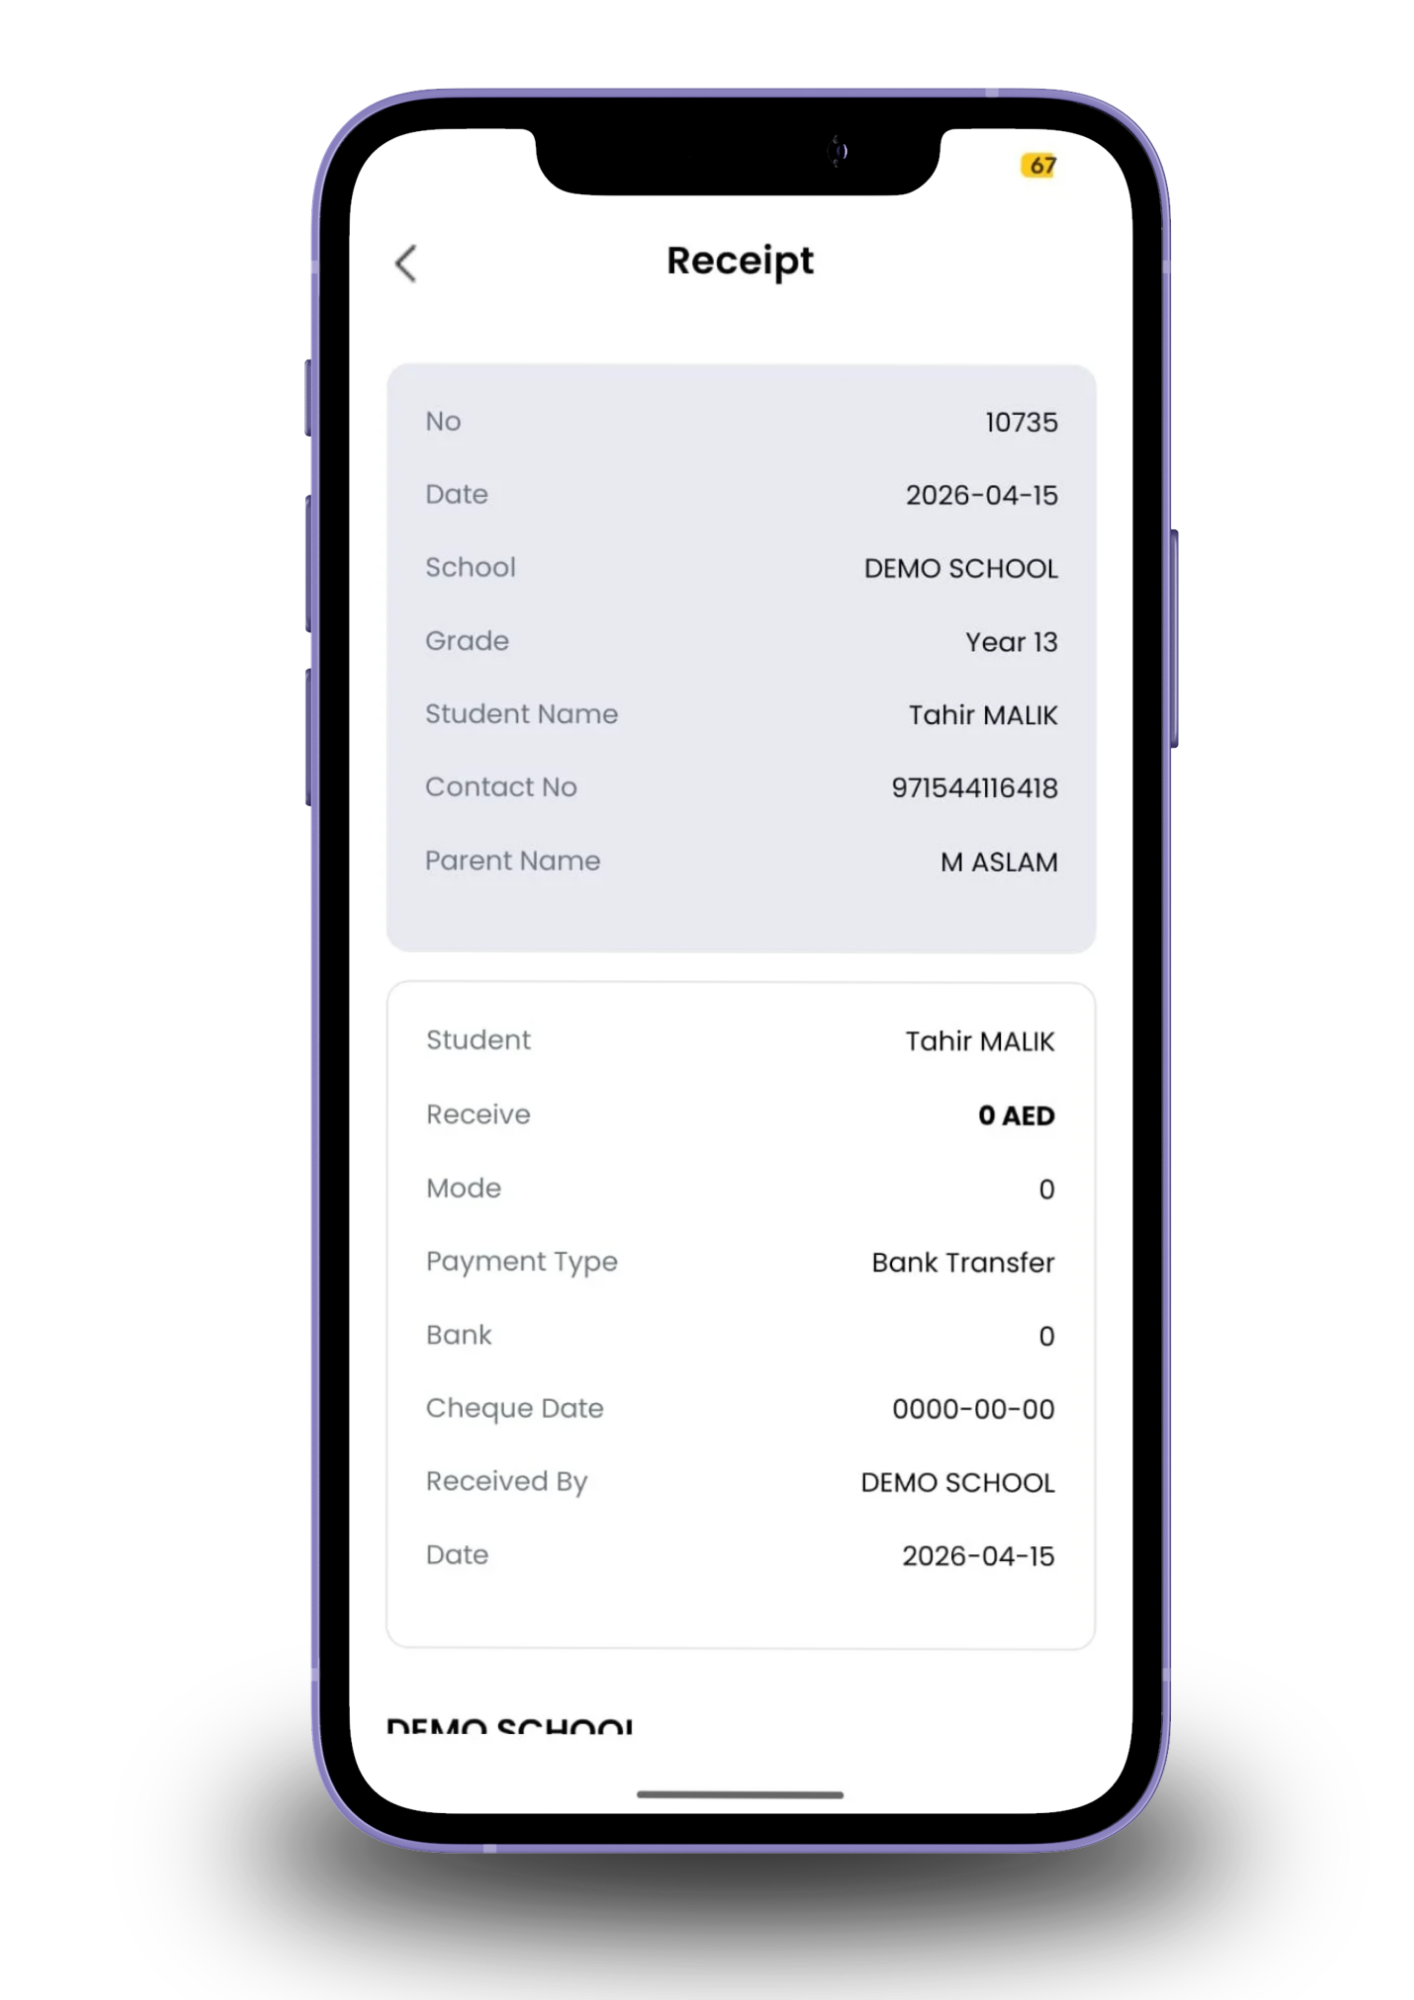
Screen: Receipt Screen

Tap Payment Receipt from your child’s profile to view all confirmed payments.
Each receipt includes the receipt number, date, school, grade, student name, parent name, and contact number.
Payment details include the amount received, payment method, bank details, and receiving party.
Scroll down to view the school coordinator’s contact information and Arab Falcon office details.
Tap Download Receipt to save or share a copy of the receipt.
Step 7 — Payment Receipt

Screen: Receipt Screen

Tap Payment Receipt from your child’s profile to view all confirmed payments.
Each receipt includes the receipt number, date, school, grade, student name, parent name, and contact number.
Payment details include the amount received, payment method, bank details, and receiving party.
Scroll down to view the school coordinator’s contact information and Arab Falcon office details.
Tap Download Receipt to save or share a copy of the receipt.
Step 8 — Payment Invoice

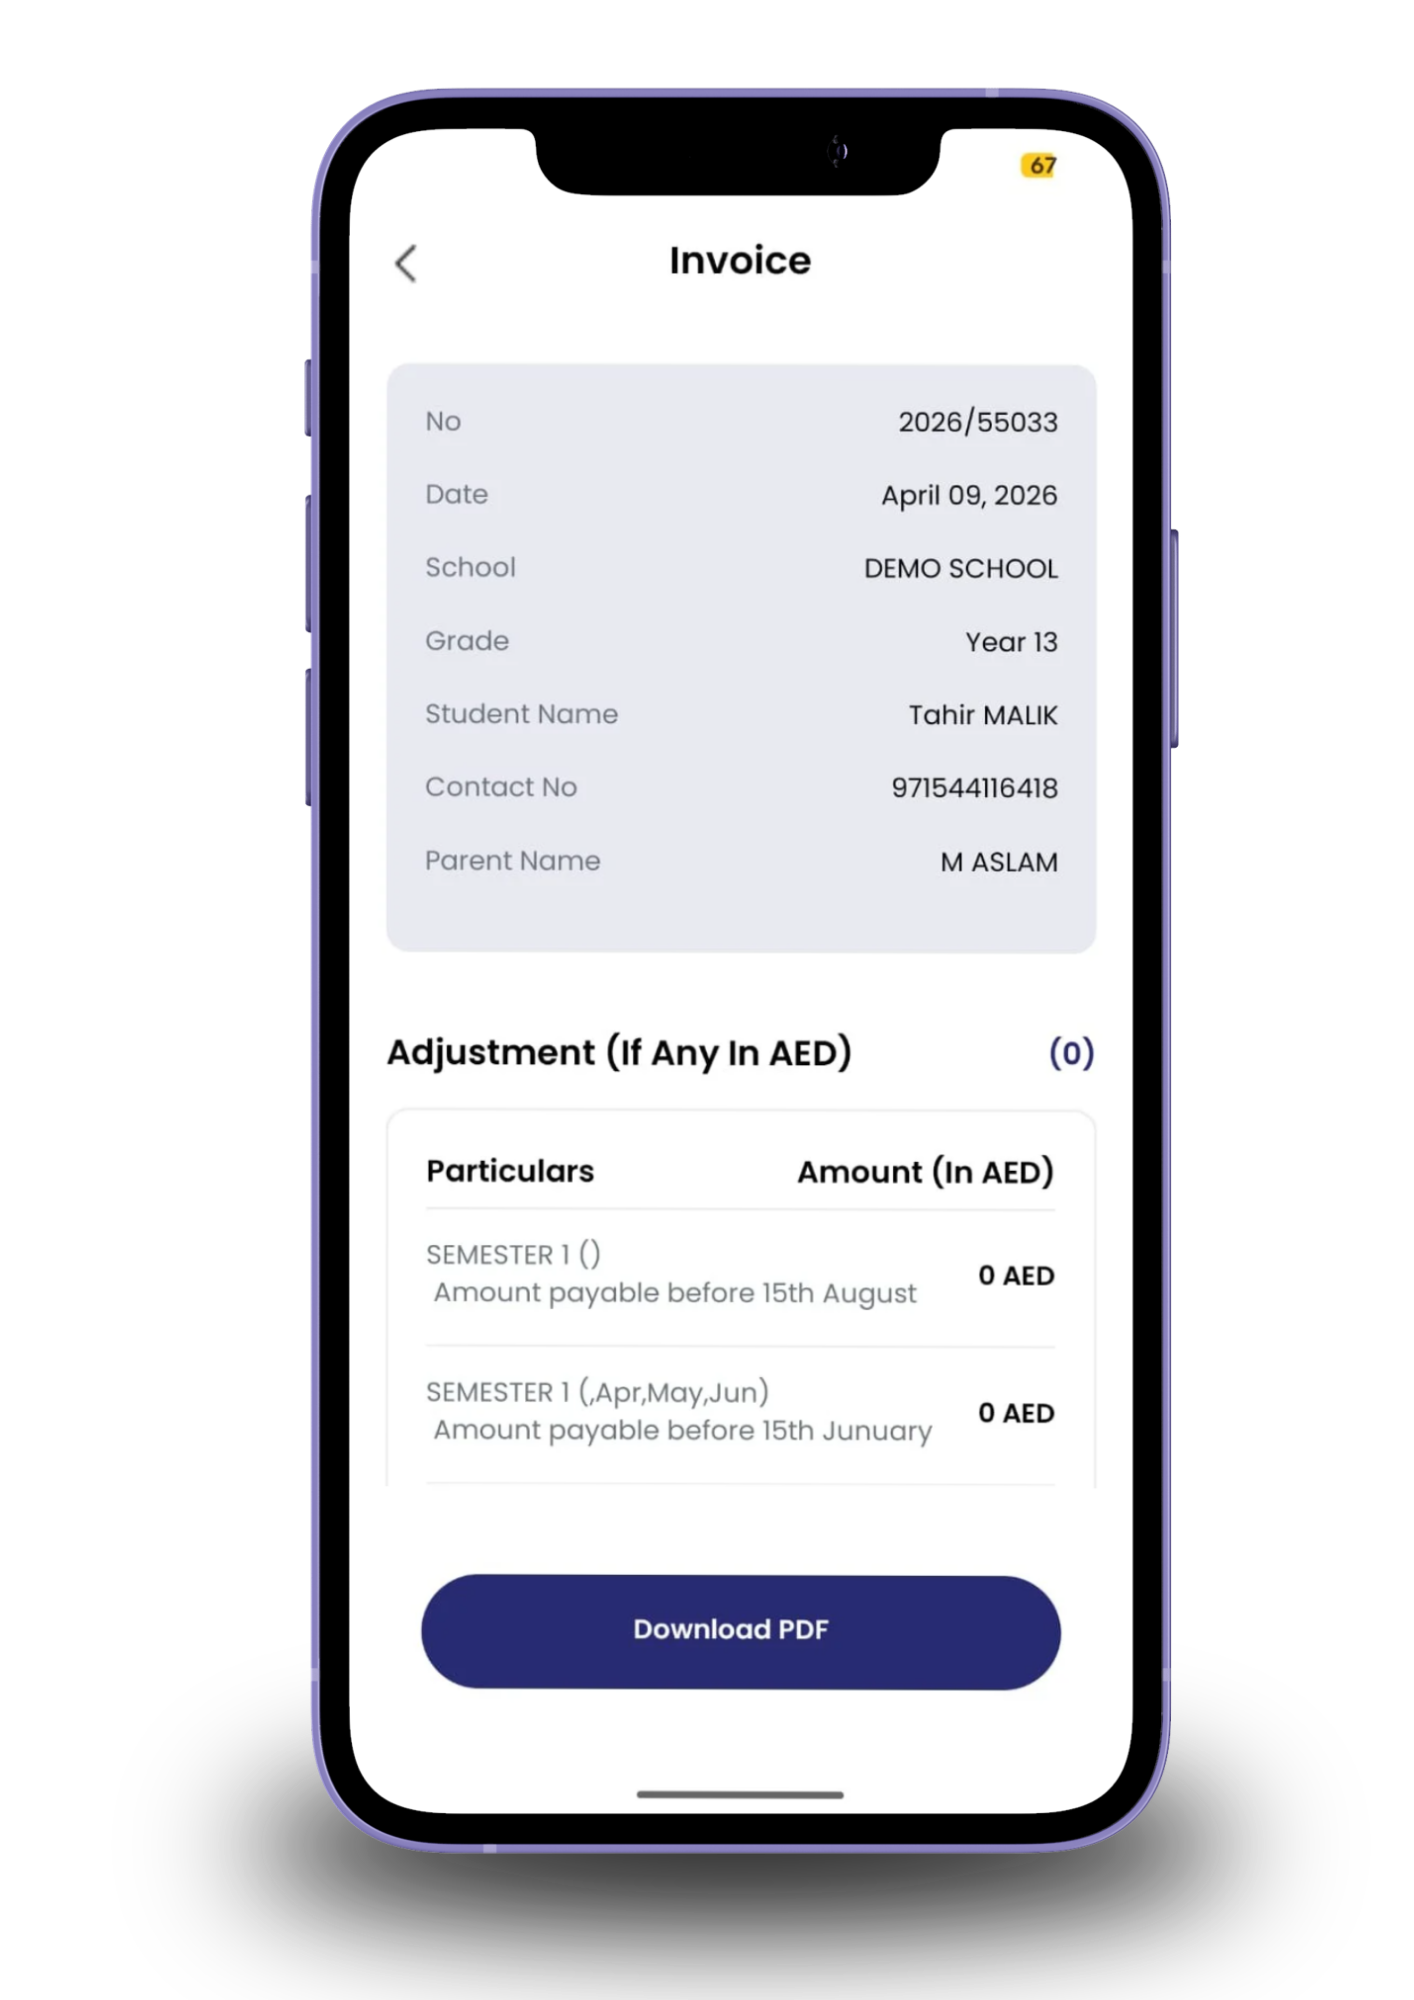
Screen: Invoice Screen

Tap Payment Invoice from your child’s profile to view outstanding fees.
Each invoice displays the invoice number, date, school, grade, student name, and parent details.
Fee breakdowns are displayed semester by semester, including the amount due in AED and the payment due date.
Tap Download PDF to save the invoice directly to your device.
Payment can be made via bank transfer or cheque — payment instructions are provided within the invoice.
Step 9 — New Registration

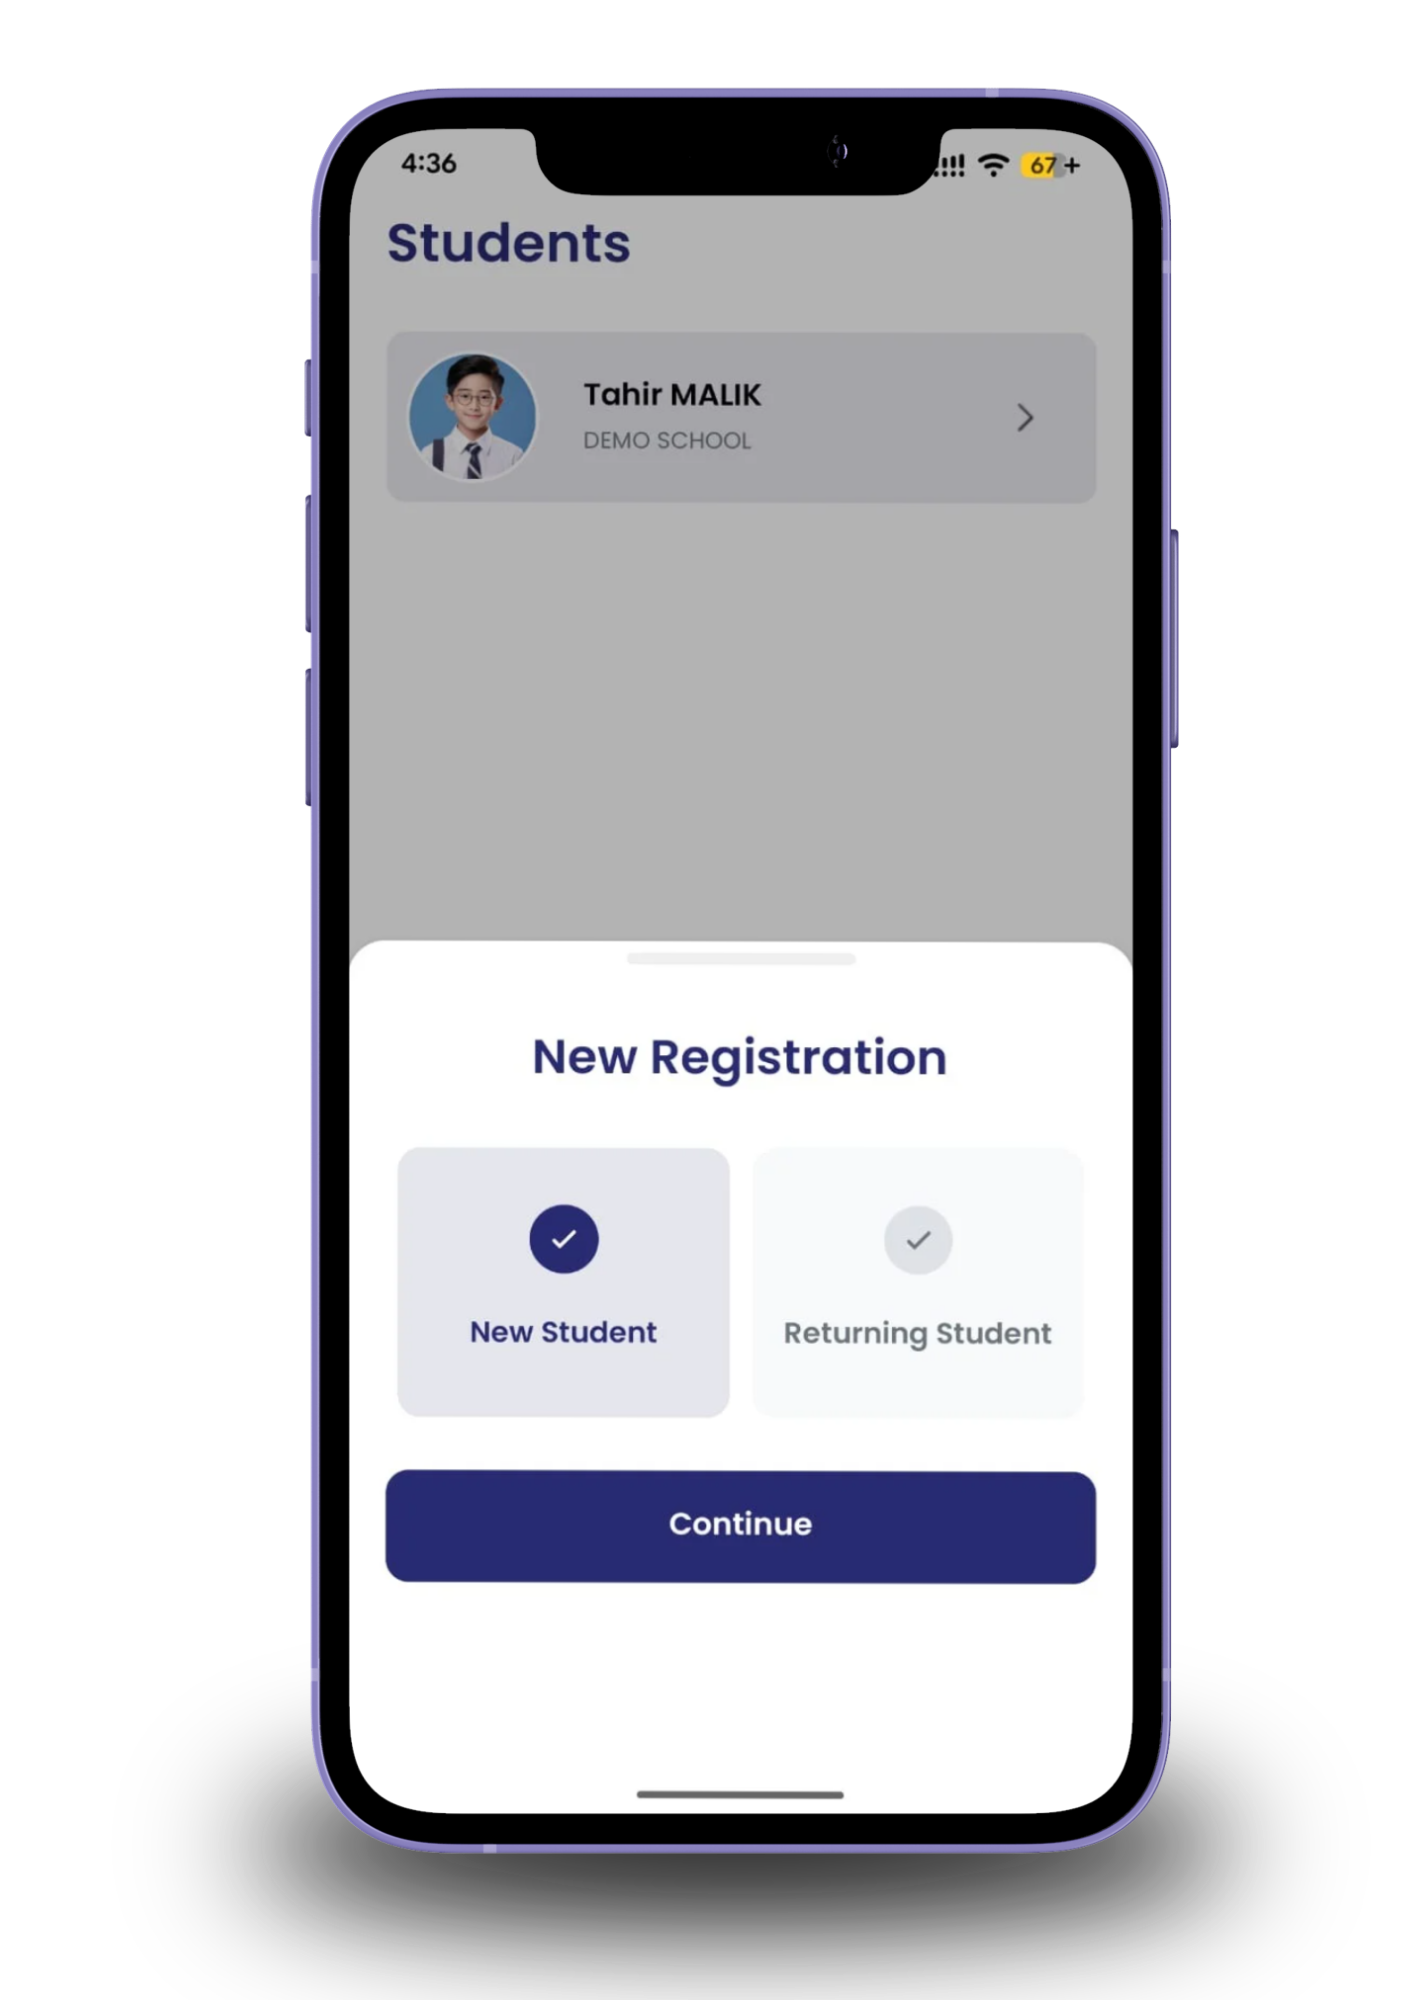
Screen: New Registration Screen

Tap the Students icon from the bottom navigation bar to view all registered children.
Tap the New Registration button at the bottom of the screen.
Choose between New Student for first-time registration or Returning Student for an existing child.
Select your option and tap Continue to proceed to the registration form.
You can also register a sibling directly from the Register Your Sibling banner on the Home Screen.
Step 9 — New Registration

Screen: New Registration Screen

Tap the Students icon from the bottom navigation bar to view all registered children.
Tap the New Registration button at the bottom of the screen.
Choose between New Student for first-time registration or Returning Student for an existing child.
Select your option and tap Continue to proceed to the registration form.
You can also register a sibling directly from the Register Your Sibling banner on the Home Screen.
Step 10 — Leave Request & ECA/CCA Request

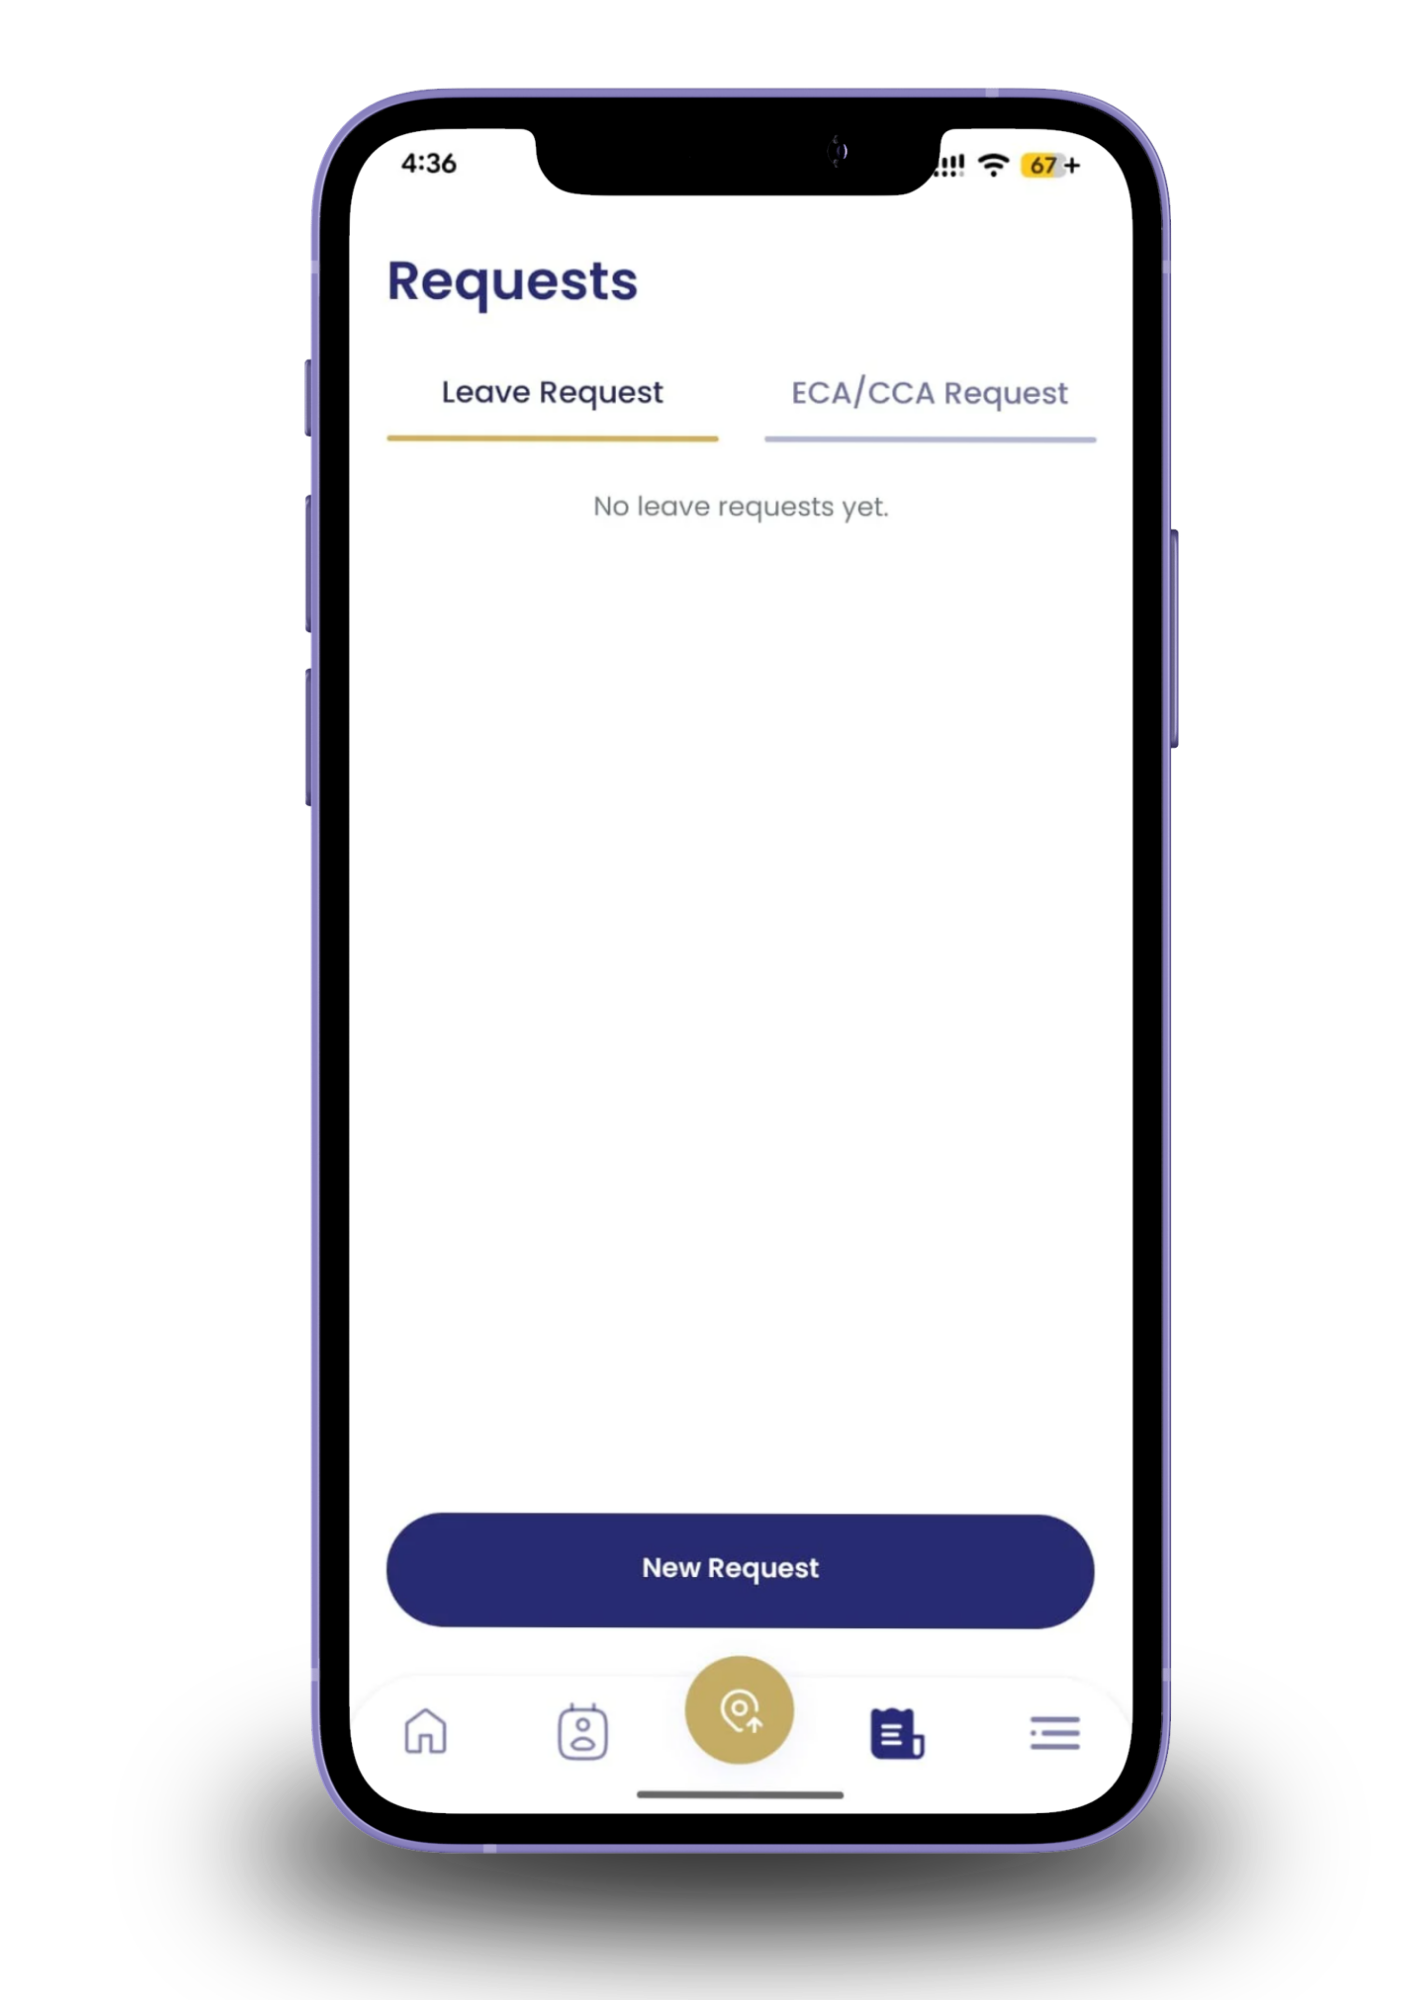
Screen: Requests Screen

Tap the Requests icon from the bottom navigation bar to access all requests.
The screen contains two tabs: Leave Request and ECA/CCA Request.
Under Leave Request, tap New Request to notify the school of a planned absence.
Select the student, leave type, start date, end date, and add a note before submitting.
Switch to the ECA/CCA Request tab to request transport for activities. Select the student, choose the days, set the date range, add a note, and submit.
All submitted requests are displayed on this screen for easy tracking.
Step 11 — More / My Profile

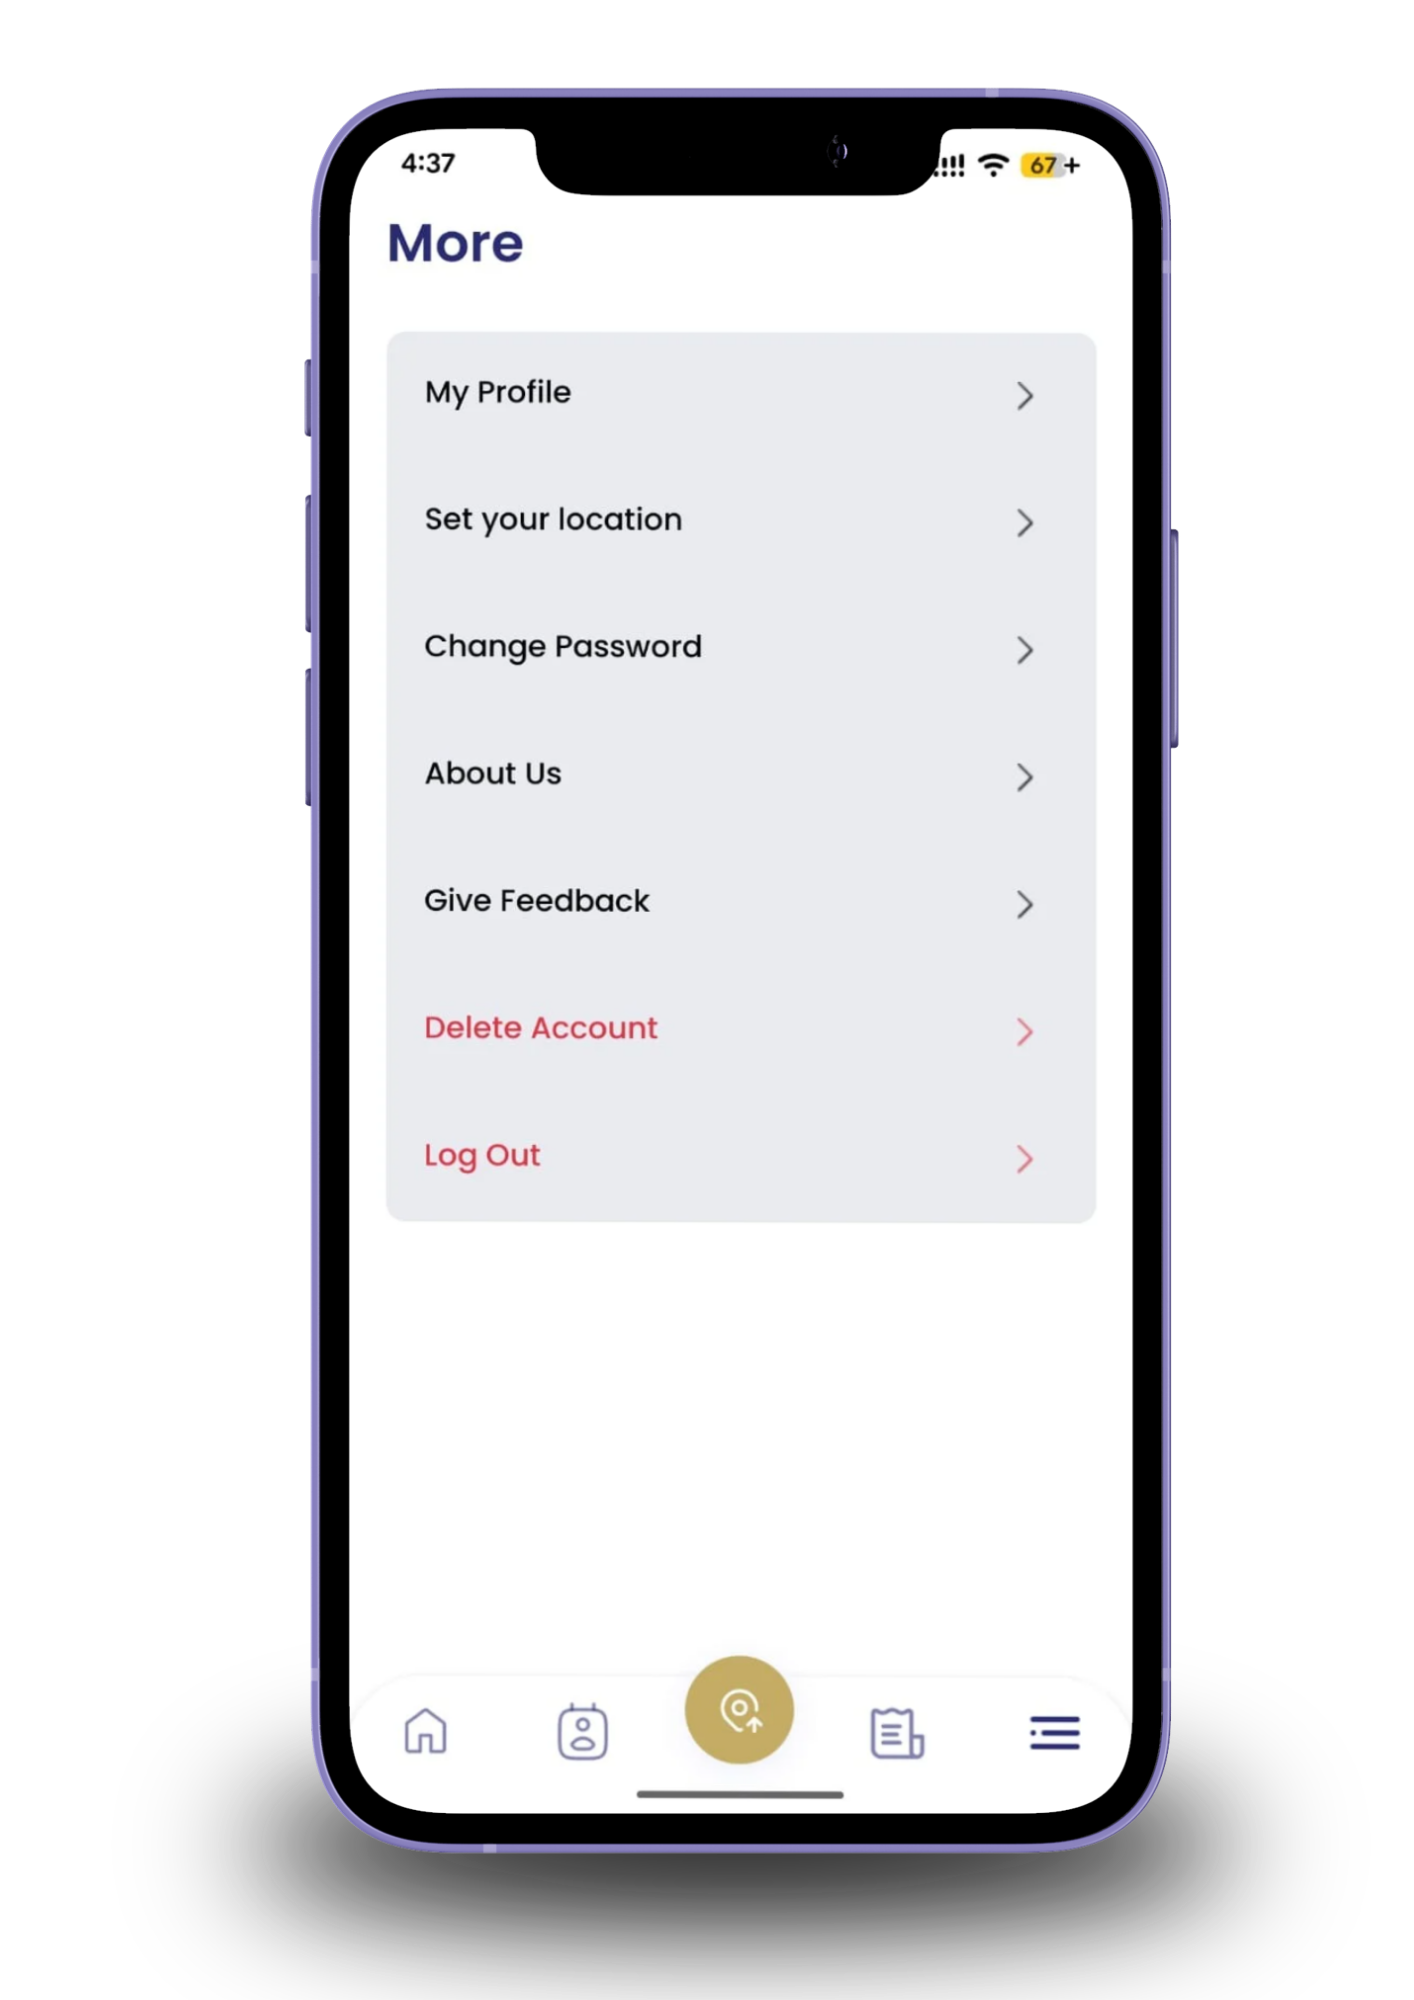
Screen: More Screen

Tap the menu icon at the bottom-right corner to access the More section.
Tap My Profile to view and update your personal information.
Use Set Your Location to save your home address for accurate pickup tracking.
Tap Change Password to update your login credentials at any time.
Visit About Us to learn more about Arab Falcon Bus Rental L.L.C.
Use Give Feedback to share your experience or report any issues.
Tap Log Out to securely sign out of your account.
Step 11 — More / My Profile

Screen: More Screen

Tap the menu icon at the bottom-right corner to access the More section.
Tap My Profile to view and update your personal information.
Use Set Your Location to save your home address for accurate pickup tracking.
Tap Change Password to update your login credentials at any time.
Visit About Us to learn more about Arab Falcon Bus Rental L.L.C.
Use Give Feedback to share your experience or report any issues.
Tap Log Out to securely sign out of your account.